Covid Tracking API v2

Introduction

The Covid Tracking Project API (CTP API) allows users to access data in real time relating to positive Covid-19 related cases in the United States. The API is organized using a REST architectural style, and uses an HTTP GET request for each available endpoint. Each endpoint returns a standardized HTTP response code, along with a JSON-encoded object as a response.

Base URL: https://api.covidtracking.com/

Access to Legacy Version

Notice: The legacy version (v1) is depreciated and will be removed on May 21, 2021. It is recommended that users update their applications to use the new v2 API endpoints.

You can access version 2 (recommended) here:
https://api.covidtracking.com/v2

To access the legacy API:
https://api.covidtracking.com/v1

Authorization (Legacy)

Notice: v2 of the API no longer requires authorization. It is recommended to update your applications to use the new v2 API endpoints. This section is left here for archival purposes.

The CTP API uses OAuth2 in order to authorize and authenticate API requests. To make a request to the API, you must acquire a client ID, which you can find here: https://covidtracking.com/data/api/authorize

The login screen will ask for your username and password. Once logged in, the API will redirect you to a page that reveals your client ID. You must append the client ID to each API request that you make.

The client ID to append to the end of your URL will look like this:
client_id={CLIENT_ID}

An example API request would look like this:
api.covidtracking.com/v1/states?client_id=16724286

Getting Started

To access all national data available in reverse chronological order, send an HTTP GET request to this endpoint:
https://api.covidtracking.com/v2/us/daily.json

You can use a tool such as curl in order to send an HTTP request to this resource. The curl request would look like this:

1
curl https://api.covidtracking.com/v2/us/daily.json

An HTTP status of 200 indicates that your request was successful.

Interpreting the JSON Response

The API will return a JSON encoded response that’s simplified to look like this:

1
2
3
4
5
{
"links": {},
"meta": {},
"data": []
}

As you can see, the API returns three top level resources:

  • [Object] links: contains information about the accessed endpoint.
  • [Object] meta: contains information including build time and parameters used to generate the response.
  • [Array] data: contains the national data on covid reports.

What we are most interested in is the information contained within the data array. Open the data array. You will see a list of objects contained inside of it. Each object in this array represents a testing sample from a specific date, along with information about the case results, testing, and outcomes for each date. The objects in the array are in reverse chronological order, starting with the latest date as index 0, and the first day of testing as the last.

1
2
3
4
5
6
7
{
"date": "2020-09-01",
"states": 56,
"cases": {},
"testing": {},
"outcomes": {}
}

As you can see in our current sample, the date is September 1st, 2020, and there were 56 states sampled from on this date. Open the cases object to see more information about the positive test cases found on this date.

1
2
3
4
5
6
7
8
9
10
cases {
total {
"value": 28296840,
"calculated": {
"population_percent": 8.5542,
"change_from_prior_day": 71245,
"seven_day_change_percent": 1.7
}
}
}

Here, you can see the total amount of positive cases for this date was 28,296,840. The cases object also provides some calculated values, such as the amount of positive cases found on that date contributing to the total value.

For more information on the cases object and its field definitions, you can reference the Resources section of this guide.

Endpoints

The Covid Tracking Project API is organized into two main categories:

  • National Data
  • State & Territories Data

National Data

Historic US Values

Retrieves all national positive cases in reverse chronological order.

URL path: /v2/us/daily.json
HTTP Methods: GET
Example: https://api.covidtracking.com/v2/us/daily.json


Single Day of Data

Retrieves a single day of positive cases on a national level.

URL path: /v2/us/daily/{date-iso-format}.json
HTTP Methods: GET
Arguments:

  • date-iso-format: The date to retrieve data from. Follows the format yyyy-mm-dd.

Example: https://api.covidtracking.com/v2/us/daily/2021-01-02.json


States and Territorial Data

Historic Data for a State or Territory

Retrieves all positive cases within a state in reverse chronological order.

URL path: /v2/states/{state-code}/daily.json
HTTP Methods: GET
Arguments:

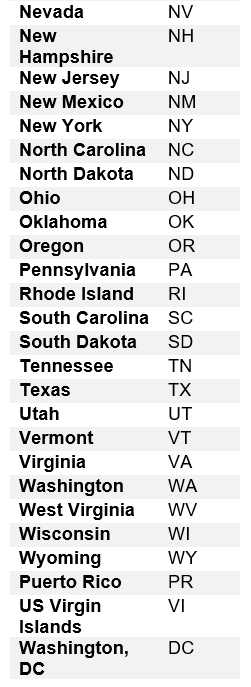
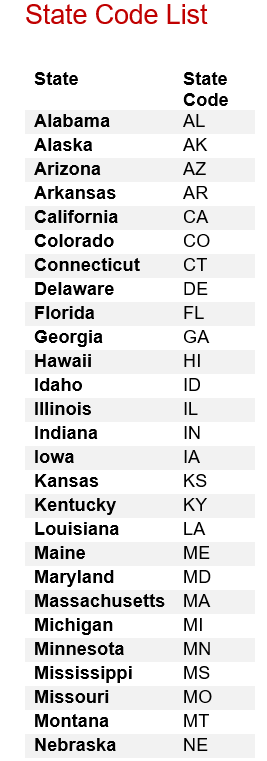
  • state-code: The two-character acronym representing the state or territory. Refer to the State Codes section for reference.

Example: https://api.covidtracking.com/v2/states/ca/daily.json


Single Day of Data for a State or Territory

Retrieves a single date of data on a state level.

URL path: /v2/states/{state-code}/{date-iso-format}.json
HTTP Methods: GET
Arguments:

  • state-code: The two-character acronym representing the state or territory. Refer to the State Codes section for reference.
  • date-iso-format: The date to retrieve data from. Follows the format yyyy-mm-dd.

Example: https://api.covidtracking.com/v2/states/ca/2021-01-10.json

Resources

The links object contains information on the endpoint used to access the API. The API will generate and attach a links object to every API request made.

1
2
3
"links": {
"self": "https://api.covidtracking.com/us/daily"
}

[string] links: The endpoint used to access the API.

Meta

The meta object contains information on the current build metadata. The API will generate and attach a metadata object to every API request made.

1
2
3
4
5
6
"meta": {
"build_time": "2021-06-01T07:03:25.055Z",
"license": "CC-BY-4.0",
"version": "2.0-beta",
"field_definitions": [...]
}

[string] build_time: The date and time that the API was last built.
[string] license: The license that the current API version is registered under.
[string] version: The current version of the API.
[array] field_definitions: An array containing the field names used within the API.

Cases

The cases object contains information on the amount of positive cases found.

1
2
3
4
5
6
7
8
9
10
"cases": {
total {
"value": 28296840,
"calculated": {
"population_percent": 8.5542,
"change_from_prior_day": 71245,
"seven_day_change_percent": 1.7
}
}
}

[int] value: The total amount of positive cases found.
[float] population_percent: The percentage that the value represents over the total population living in the US.
[int] change_from_prior_day: The difference between the amount of new cases found from yesterday.
[float] seven_day_change_percent: The percentage of change calculated between a seven day period.

Testing

The testing object represents information on the total amount of tests administered.

1
2
3
4
5
6
7
8
9
10
"testing": {
total {
"value": 363825123,
"calculated": {
"population_percent": 109.9858,
"change_from_prior_day": 1170059,
"seven_day_change_percent": 2.8
}
}
}

[int] value: The total amount of Covid tests administered.
[float] population_percent: The percentage that the value represents over the total population living in the US.
[int] change_from_prior_day: The difference between the amount of tests cases reported from yesterday.
[float] seven_day_change_percent: The percentage of change calculated between a seven day period.

Outcomes

The outcomes object contains information on the consequences related to Covid-19, including the number of people who are:

  • Hospitalized
  • Dead
1
2
3
4
"outcomes": {
"hospitalized": {...},
"death": {...}
}

Please refer to Hospitalized and Death in the resources section for more information on each object.

Hospitalized

The hospitalized object contains information on the total number those who are hospitalized due to Covid-19, including cases of those who are:

  • in ICU
  • on a ventilator
1
2
3
4
5
6
7
8
9
10
11
12
13
"hospitalized": {
"currently": {
"value": 40199,
"calculated": {
"population_percent": 0.0122,
"change_from_prior_day": -1202,
"seven_day_change_percent": -15.1,
"seven_day_average": 43843
}
},
"in_icu": {...},
"on_ventilator": {...}
}

[int] value: The total amount of people hospitalized due to Covid-19.
[float] population_percent: The percentage that the value represents over the total population living in the US.
[int] change_from_prior_day: The difference between the amount of people hospitalized reported from yesterday.
[float] seven_day_change_percent: The percentage of change calculated between a seven day period.
[int] seven_day_change_percent: The average calculated within a seven day period.

Please refer to In ICU and On Ventilator in the resources section for more information on each object.

In ICU

The in_icu object contains all the information on those who are hospitalized and put into Intensive Care Unit due to Covid-19.

1
2
3
4
5
6
7
8
9
10
11
"in_icu": {
"currently": {
"value": 8134,
"calculated": {
"population_percent": 0.0025,
"change_from_prior_day": -275,
"seven_day_change_percent": -17,
"seven_day_average": 8938
}
}
}

[int] value: The total amount of people who were put into ICU due to Covid-19.
[float] population_percent: The percentage that the value represents over the total population living in the US.
[int] change_from_prior_day: The difference between amount of people put into ICU reported from yesterday.
[float] seven_day_change_percent: The percentage of change calculated between a seven day period.
[int] seven_day_change_percent: The average calculated within a seven day period.

On Ventilator

The on_ventilator object contains the all information on those who were hospitalized and put on a ventilator due to Covid-19.

1
2
3
4
5
6
7
8
9
10
11
"on_ventilator": {
"currently": {
"value": 2802,
"calculated": {
"population_percent": 0.0008,
"change_from_prior_day": -9,
"seven_day_change_percent": -13.7,
"seven_day_average": 2987
}
}
}

[int] value: The total amount of people put on a vnetilator due to Covid-19.
[float] population_percent: The percentage that the value represents over the total population living in the US.
[int] change_from_prior_day: The amount of people who are reported to be on ventilation from yesterday.
[float] seven_day_change_percent: The percentage of change calculated between a seven day period.
[int] seven_day_change_percent: The average calculated within a seven day period.

Death

The death object contains information on all those who died due to Covid-19.

1
2
3
4
5
6
7
8
9
10
11
"death": {
"total": {
"value": 515151,
"calculated": {
"population_percent": 0.1557,
"change_from_prior_day": 842,
"seven_day_change_percent": 2.4,
"seven_day_average": 510267
}
}
}

[int] value: The total amount of people who died due to Covid-19.
[float] population_percent: The percentage that the value represents over the total population living in the US.
[int] change_from_prior_day: The difference between the amount of people who died from yesterday.
[float] seven_day_change_percent: The percentage of change calculated between a seven day period.
[int] seven_day_change_percent: The average calculated within a seven day period.

State Codes
Amazon Web Services - Load Balancers

Introduction

This document covers the basic concepts and terminology used in Amazon Web Services (AWS) regarding load balancers, and teaches you how to create and configure your own application load balancer.

By the end of this guide, you will learn:

  • What a load balancer is
  • What an application load balancer is
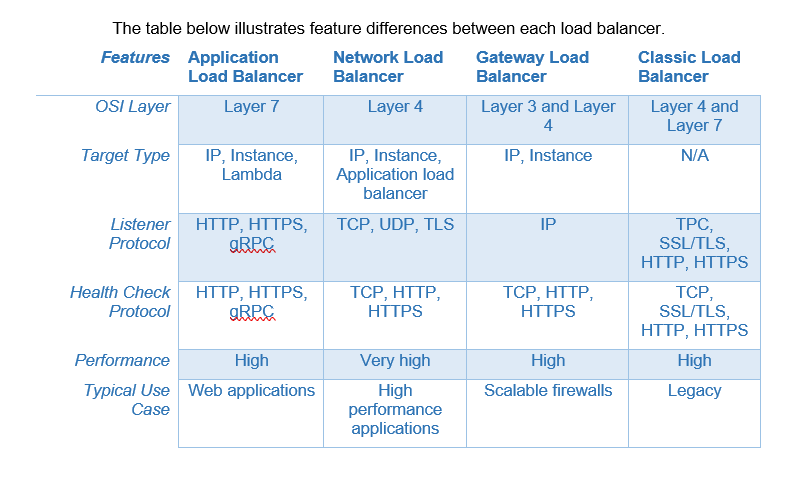
  • The differences between the different Load Balancer services
  • How to create an Application Load Balancer using the AWS Management Console

Concepts that wont be covered in this guide include:

  • How to create a root account
  • How to create an IAM account
  • How to create a VPC
  • How to create a security group
  • How to create an application load balancer through the command line interface

Prerequisites

Before you begin, the following services should be created on your AWS account:

  • A root account.
  • An IAM account that has the following role permissions:
    • AdministratorAccess
  • A VPC that has the following properties:
    • IPv4 CIDR block: 10.0.0.0/16
    • IPv6 CIDR block: None
    • Tenancy: Default
    • Availability Zones: 2
    • Number of public subnets: 2
    • Number of private subnets: 0
    • NAT gateways: None
    • VPC endpoints: None
    • Enable DNS hostnames: True
    • Enable DNS resolution: True
  • An EC2 instance that has the following properties:
    • AMI: Amazon Linux 2 AMI (HVM) - Kernel 5.10, SSD Volume Type
    • Architecture: 64-bit(x86)
    • Instance Type: t2.micro
    • VPC: Use the one created above
    • Auto-assign public IP: Enable
    • Storage: 1x8 GiB GP2 Root Volume
    • Number of instances: 1
    • Optional: A web server of your choosing installed inside of your EC2 instance for testing purposes. The web server should have the following properties:
      • Network protocol: HTTP
      • Listening on port: 80
  • A security group with the following properties:
    • Inbound rules:
      • Type: All traffic
      • Protocol: All
      • Port Range: All

Load Balancers

What are Load Balancers?

A load balancer is a service in AWS that allows you to redistribute incoming traffic to other services within your AWS infrastructure.

Load balancers have several features, including:

  • High availability
  • Elasticity
  • Traffic load balancing
  • Health checks
  • Low running costs

Why use a Load Balancer?

The five most common use cases are:

  • to create high availability using different Availability Zones
  • to spread server load across multiple different services
  • to conduct health checks on services, and handle failures of unhealthy services
  • to expose a single point of access to multiple different services
  • to separate public traffic from private traffic

Types of Load Balancers

AWS supports four different types of load balancers:

  • Application Load Balancer
  • Network Load Balancer
  • Gateway Load Balancer
  • Classic Load Balancer (legacy)

Application Load Balancers

What is an Application Load Balancer?

An application load balancer (ALB) is a specialized type of load balancer provided by AWS that has features suited for distributing traffic between EC2 instances.

The features that application load balancers introduce include:

  • Routing rules
  • HTTP/2 support
  • WebSocket support
  • Configuration settings to return a redirection or fixed response

Why use an Application Load Balancer?

Application load balancers are best suited for when you want to redistribute traffic to EC2 instances running web application infrastructure.
These services include:

  • Static websites
  • Web applications
  • Mobile applications
  • RESTful APIs
  • Microservices

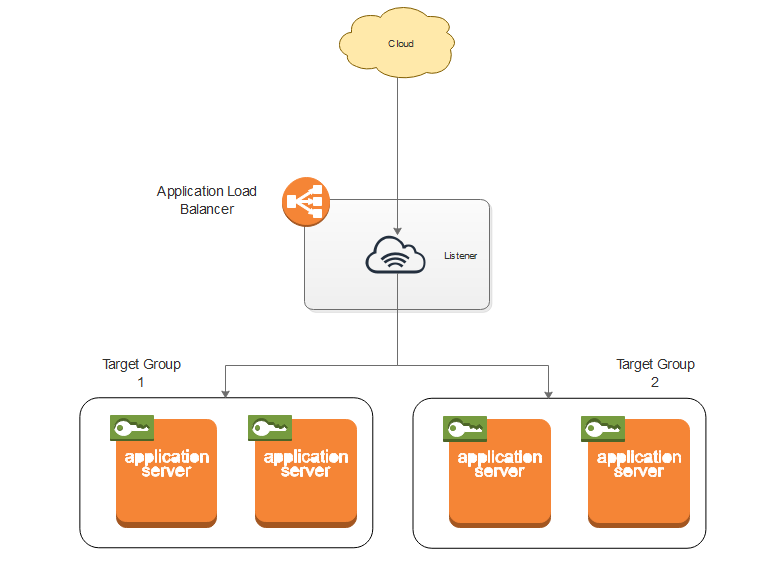
How Application Load Balancers Work

  1. The user makes a request to your application.

  2. The listeners in your load balancer receive requests matching the protocol and port that you configure.

  3. The receiving listener evaluates the incoming request against the rules you specify in your security policy, and if applicable, routes the request to the appropriate target group.

  4. Healthy targets in one or more target groups receive traffic based on the load balancing algorithm, and the routing rules you specify in the listener.

Create an Application Load Balancer

This section covers a step by step procedure for creating an application load balancer in AWS. Each sub section is organized into tasks that you will complete on separate pages. It is recommended that you read this section in a sequential order.

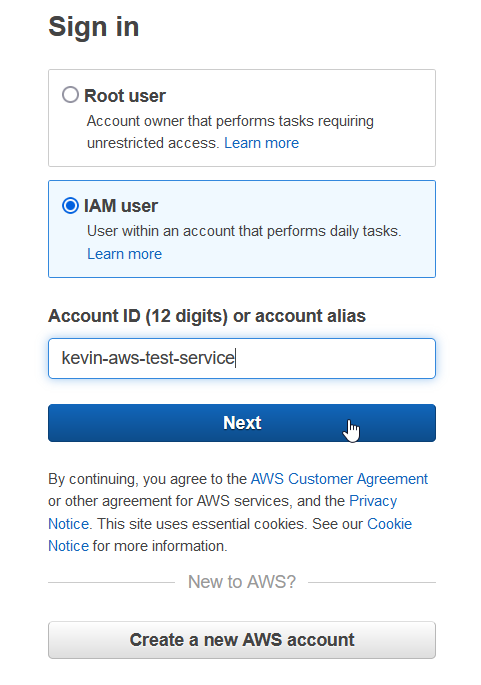
Sign in to IAM Account

  1. Click the Sign in button at the top right of the page.
  1. Click on the IAM user radio button.
  2. Type either your Account ID or the alias associated with your IAM into the Account ID text box.
  3. Click Next to continue to the next screen.
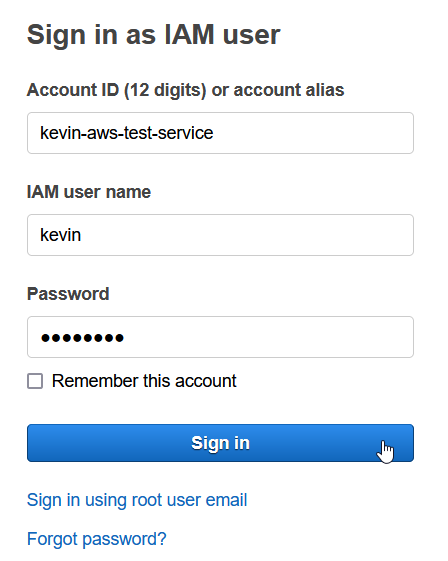
  1. (Optional) The account ID should automatically fill itself in. If not, type your account ID into the Account ID textbox.
  2. Type your IAM user name into the IAM user name text box.
  3. Type your password associated with your IAM user account into the Password textbox.
  4. (Optional) Check the Remember this account check box if you want AWS to remember your sign in credentials.
  5. Click Sign in to continue onto the next screen.

Find Load Balancer Management Console

To find the load balancer management console in the AWS dashboard:

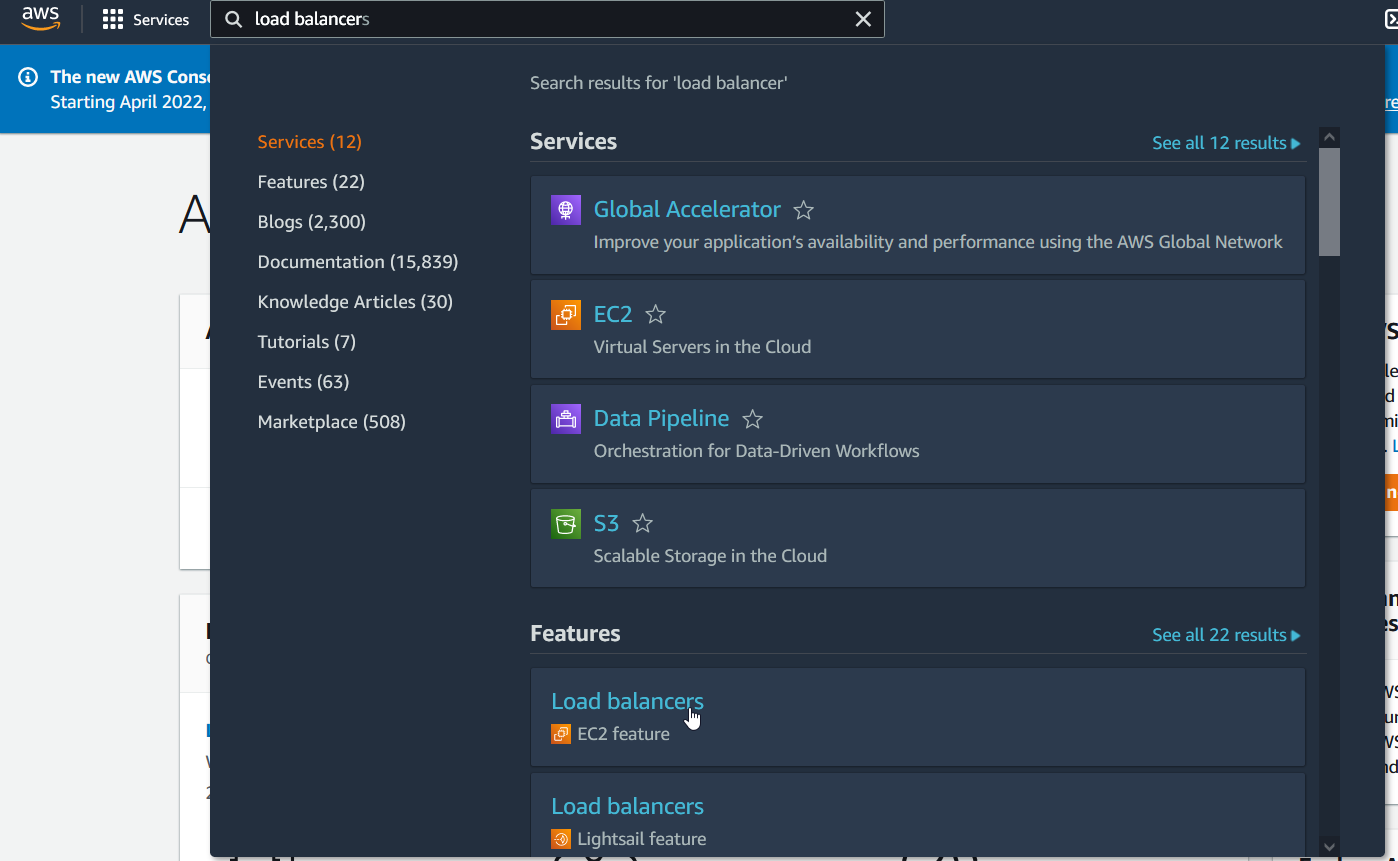
  1. Type “load balancer” into the search bar located on the top navigation bar.
  2. When the pull-down menu appears, click on Services > Features > Load balancers - EC2 feature.

Note: There are several load balancers under the Feature section. Make sure you select the correct one that says EC2 feature underneath the name.

Load Balancer Management Console

The EC2 load balancer management console allows you to manage, add, and remove all the load balancers you have created under the EC2 feature type.

The Create Load Balancer button will take you to the creation wizard for creating a new load balancer.

The Actions button will open a pop up menu with options that allow you to manage any selected load balancers from the list below. The actions available for managing load balancers are:

  • Edit health check
  • Edit subnets
  • Edit IP Address type
  • Edit instances
  • Edit listeners
  • Edit security groups
  • Edit attributes
  • Delete

Below the Create and Actions button is the search bar and a list of created load balancers. This list allows you to select any load balancers you have created in order to perform management using the Action button. You can search for a load balancer by typing the name of the load balancer into the search bars textbox. Load balancers can also be ordered alphabetically by their property type by clicking on their associated property.

Each load balancer lists the following properties:

  • Name
  • DNS name
  • State
  • VPC ID
  • Availability Zones
  • Type
  • Created At

To create a new load balancer:

  1. Click on the Create Load Balancer button.

Select a Load Balancer Type

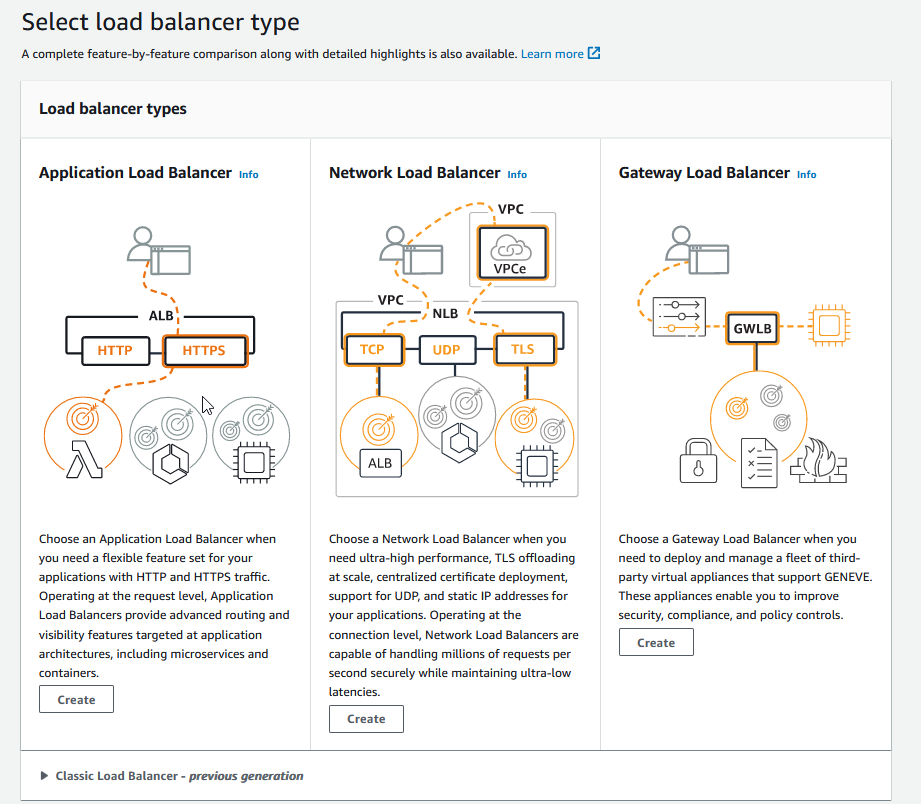
This Select a Load Balancer Type section will allow you to select a load balancer type to create. There are four types of load balancers:

  • Application Load Balancer
  • Network Load Balancer
  • Gateway Load Balancer
  • Classic Load Balancer (legacy)

To create an application load balancer:

  1. Click on the Create button, located under the Application Load Balancer table section.

Configure Basic Load Balancer Configuration

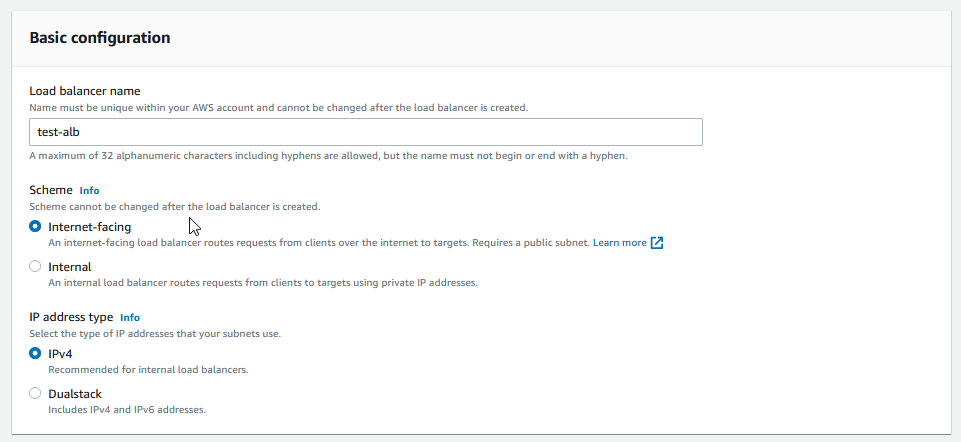
This Basic configuration section allows you to configure the basic properties of your load balancer. The three configuration options available are:

  • Load balancer name: The name of your load balancer. The name must be unique within your AWS account.
  • Scheme: Determines if the load balancer is public or private. There are two options in this menu:
  • Internet-facing: routes requests from the client to the target EC2 instance. Requires a public subnet.
  • internal: routes requests from clients to a private target. Requires a private subnet.
  • IP address type: The type of IP address your EC2 instance is using to communicate to the load balancer. There are two options in this menu:
    • IPv4: uses only IPv4 IP addresses
    • Dual Stack: uses both IPv4 and IPv6 IP addresses

To configure your load balancer, follow these steps:

  1. Type the name of your load balancer into the Load balancer name text box.
  2. Select the Internet-facing radio button under Scheme.
  3. Select the IPv4 radio button under IP address type.

Configure Network Mapping

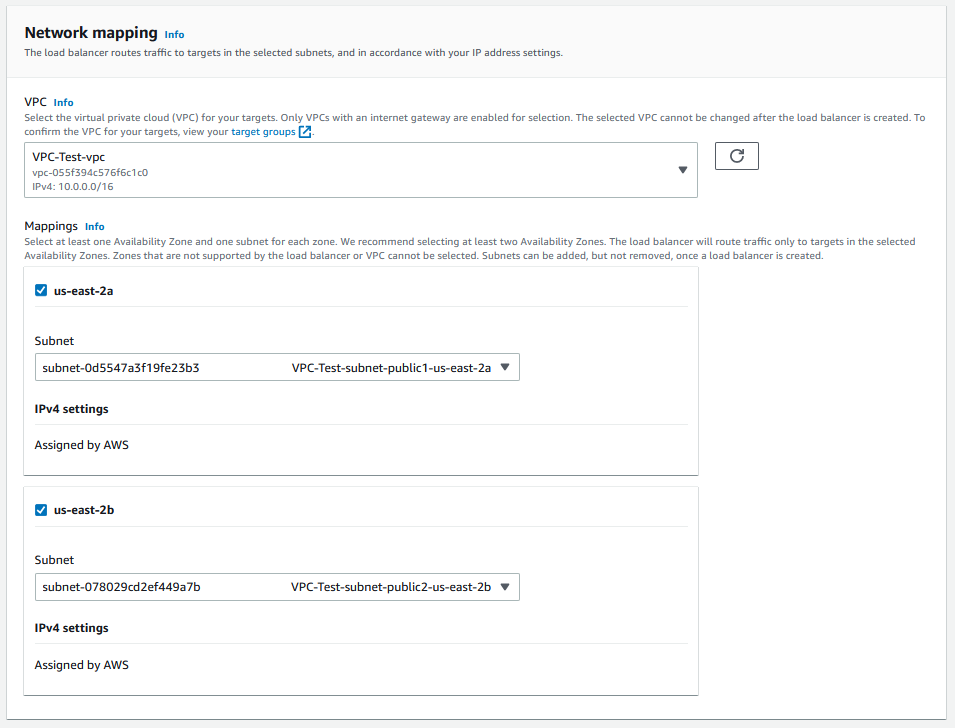
The Network mapping section allows you to configure what targets in the designated VPC subnets the load balancer will route traffic to.
There are two configuration options in this menu:

  • VPC: The virtual private cloud that the load balancer will route to.
  • Mappings: The Availability Zones and subnets that the load balancer will route to.

To configure the network settings of your load balancer, follow these steps:

  1. Select a VPC from the drop-down menu under VPC.
  2. Select at least one Availability Zone under Mappings.
  3. Under each checked Availability Zone checkbox, a drop-down menu for subnets will appear. Select any subnet from this menu.
  4. (Optional) if IPv4 is not automatically assigned on the VPC, type an IPv4 address for the subnet in the IPv4 settings textbox.

Configure Security Groups

The Security groups section allows you to configure the firewall rules for inbound and outbound traffic on your load balancer.

There are two configuration options in the security groups menu:

  • Security groups: allows you to select a security group that has already been created.
  • Create new security group link: located below the drop down menu, allows you to create a new security group through the security management console.

Note: You can track which security policies you have selected with the blue notification boxes underneath the blue link.

To configure the security groups:

  1. Select a security group from the Security groups drop down menu.

Configure Listeners and Routing

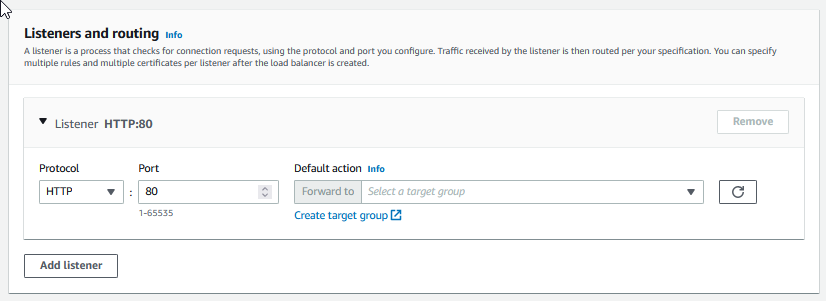
The Listeners and routing section allows you to create and remove listeners.

The Listener configuration option allows you to create and remove listeners attached to the load balancer. The following properties are available for configuring each listener:

  • protocol: Whether HTTP or HTTPs will be used
  • port number: Which port number the listener will listen on
  • default action: The instances that the load balancer will direct traffic to, also known as the target group.

Underneath the default action selection box is a link called Create target group. You can access the create target page through this link.

To create a new target group:

  1. Click on the Create target group link. This will take you to the specify group details menu.

Configure Target Group

The Target Groups page allows you to set target groups for you application load balancer.

There are three sections in this page for creating a target group:

  • Basic configuration
  • Health Checks
  • Tags

Basic Configuration

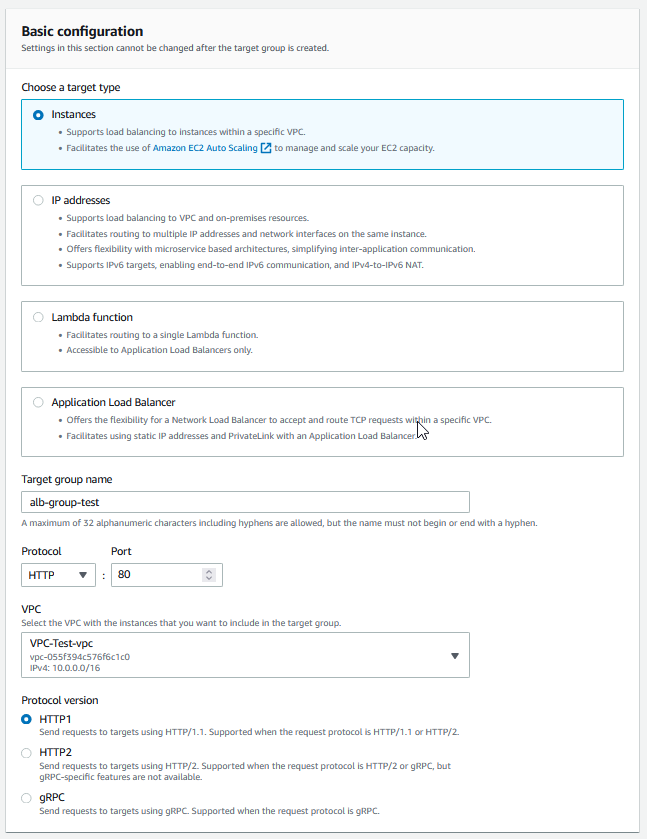
The basic configuration section has six configuration options available:

  • Target type: The type of instance your target group will consist of
  • Target group name: The name of your target group
  • Protocol: The type of networking protocol your target group will use
  • Port: The port number the target group will listen on
  • VPC: which VPC the target group will be located in
  • Protocol version: Which HTTP or gRPC protocol version to use when sending requests to target.

To configure the target group:

  1. Select the Instance radio button under the choose a target type.
  2. Type a name for the target group name in the Target group name text box.
  3. Type 80 into the Port text box.
  4. Select your VPC under the VPC drop down menu.
  5. Select the HTTP1 radio button for the protocol version.

Configure Health Checks

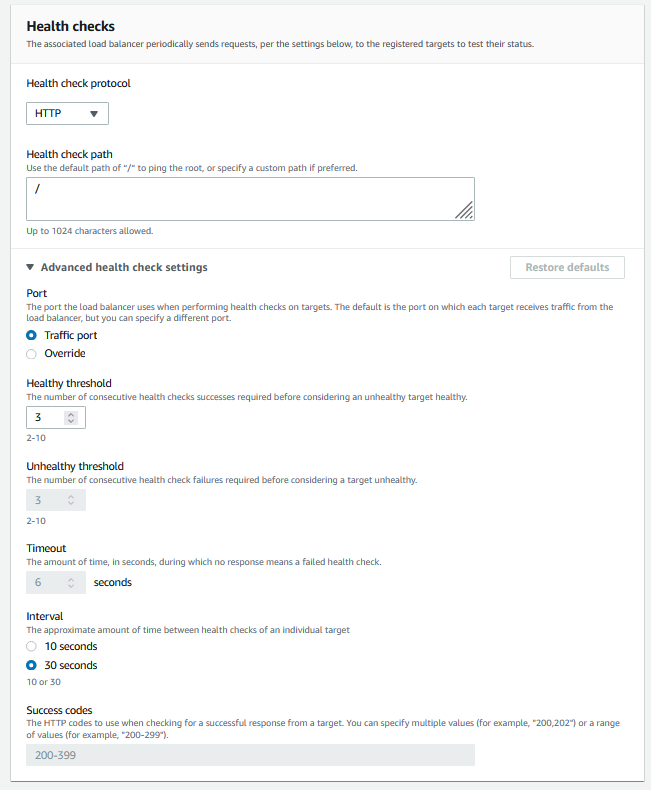
The Health checks section is used to configure any health checks that will be used on target groups.

There are two main configuration settings:

  • Health check protocol: Whether or not the health check should use HTTP or HTTPS.
  • Health check path: The path the health check will be conducted on inside your target group.

On the bottom of the Health checks section is a cascaded menu called Advanced health check settings. You can click the arrow button on the left in order to reveal the hidden menu.
There are six advanced configuration settings for further customizing your health checks:

  • Port: You can specify if you want the health check to check the port that receives traffic, or a customized port
  • Healthy threshold: How many health checks will be conducted in the specified interval before it considers an unhealthy target healthy.
  • Unhealthy threshold: How many health checks will be conducted in the specified interval before it considers an healthy target unhealthy.
  • Timeout: How many seconds the health check will give to the target before it considers it unhealthy
  • Interval: The amount of seconds between each health check
  • Success codes: Specify which HTTP codes the health check will consider healthy.

To configure the health check:

  1. Select HTTP in the Health check protocol selection box.
  2. Type “/“ into the Health check path text box. This means the health check will perform the check at the root path in your instance.

Add Tags

The Tags section allows you to create tags for categorizing your target groups.

You can add any tags for this target group using the Add tag button.
To add a tag:

  1. Click on the Add tag button
  2. Type in a tag name into the Tag name textbox
  3. Click on the Next button to continue

Register Target

The register target console manager allows you to select all the instances that your load balancer will route to.

To register your target:

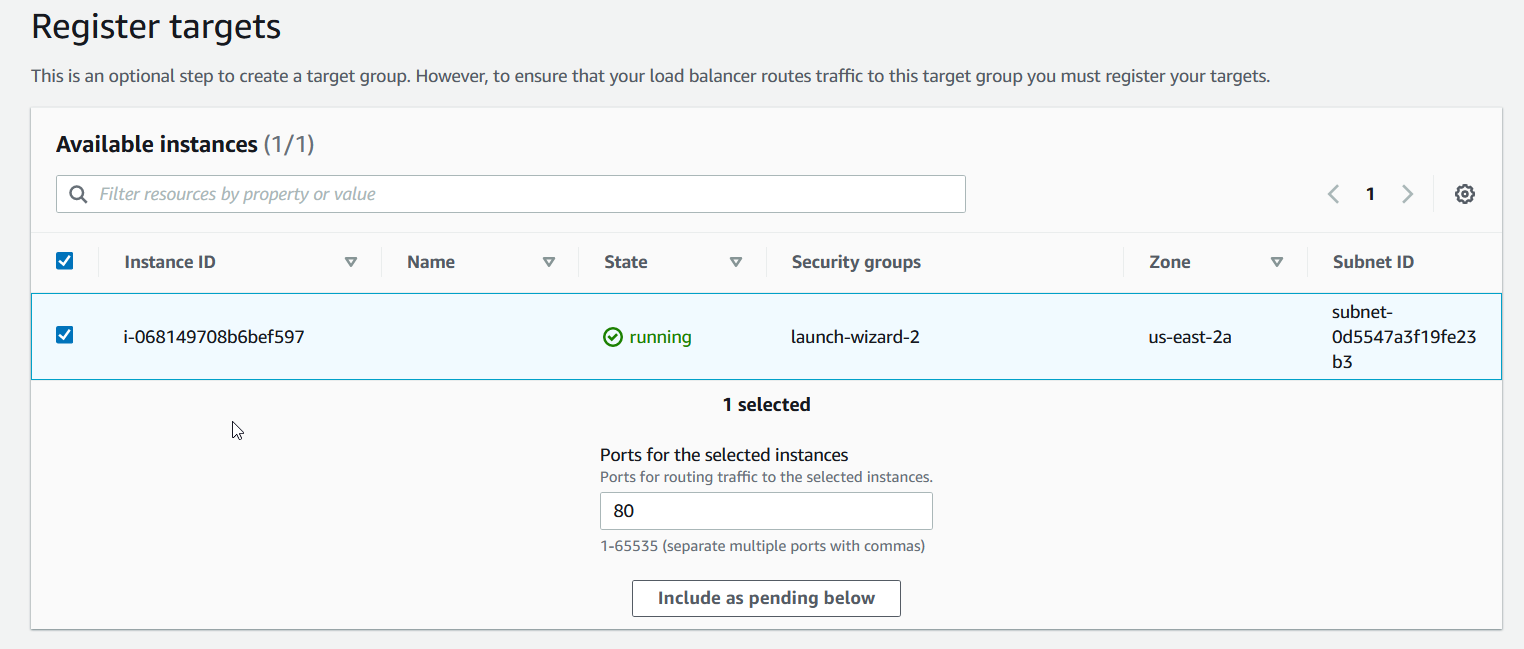
  1. Select the instances that you want the load balancer to route to by clicking on the check box to the left of the name.
  2. Type in 80 into the Ports for the selected instances textbox.
  3. Click the Create target group button to finish creating your target group.

Finish Creating the Listener

You will be redirected back onto the Listeners and routers page. To finish setting up the listener:

  1. Click the refresh button next to the default action selection box.
  2. Select the target group you created.
  3. Click the Create load balancer button to finish creating your load balancer.

Accessing the Application Load Balancer

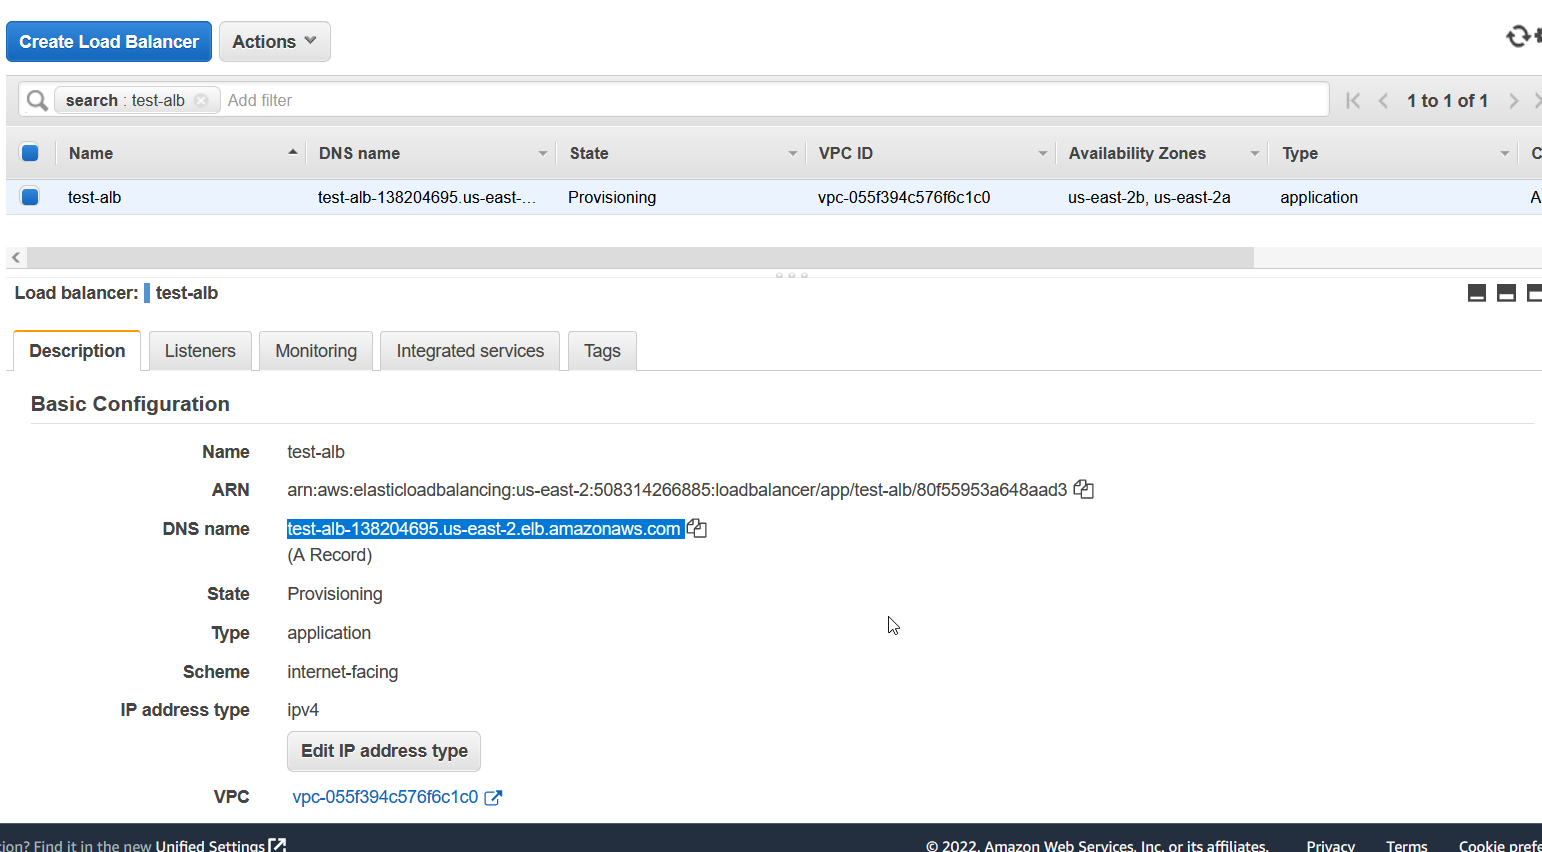
In the load balancer management screen, you should see your newly created load balancer now added to the list. Under the state section in the list of load balancers, you can see what state your load balancer is currently in. You must wait for the load balancers state to change from Provisioning to Active before you can access it.

Once the state changes to Active, you can access the load balancer by copying and pasting the DNS name url to your web address.

If everything is working correctly, you should recieve an HTTP code of 200 when you access the URL. If you created a web server in the prerequisites section, the web server should output some text onto the screen.

Glossary

This section is intended to teach you the terminology and concepts used in AWS regarding load balancers. These concepts will be referenced throughout the documentation.

Health Check

A health check is the process of sending an HTTP request to each target service in order to confirm that each target service is still working. If the target service returns an HTTP status of 200, the service is considered healthy. If the service returns a different HTTP status, the service is considered unhealthy, and the load balancer will not route any traffic to that service.

To learn more about configuring health checks, refer to the Configure Health Checks section of this document.

Listener

A listener is an AWS service that attaches itself to load balancers for the purpose of listening for incoming traffic through a designated route and port number.

To learn more about configuring listeners, refer to the Configure Listeners and Routing section of this document.

Target

A target is a service within AWS that load balancers direct traffic to. Load balancers can distribute traffic to four different target types:

  • EC2 instances
  • IP addresses
  • Lambda functions
  • Application load balancers

Target Groups

A target group refers to a collection of targets of the same target type. A target group can consist of a singular target or multiple targets of the same target type.

To learn more about configuring Target Groups, refer to the Configure-Target-Group section of this document.

Pancake

Introduction

In this guide, you will invite Pancake to your server, and learn how to use basic commands to stream music to your Discord server.

Prerequisites

You should have the following ready before you start:

  • You are logged in to Discord.
  • You have at least one server available with administrator or manager server permissions enabled.
  • You have at least one voice channel within your server.
  • You have the proper role permissions in your server to join voice channels.

How to Read this Guide

Command

A command is a series of words entered into the Discord text channel used tell Pancake what to do.

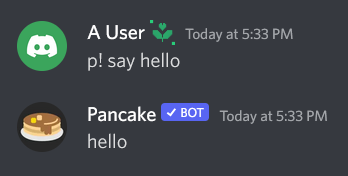
For example, the command:
p! say hello

prompts the bot to respond with the text “hello”.

In order for a command to work, you must:

  • Type and enter the command into a text channel that Pancake has “Read” access to.
  • Have a prefix attached to the beginning of the sentence.

For a full list of music commands, you can reference the commands section of this guide.

Prefix

A prefix is a series of characters appended to the beginning of a command. This is useful for telling Pancake that the series of text is a command and not regular text.

For example, in the command:
p! say hello

p! is the prefix

Default Prefix

This guide assumes that you are using Pancakes default prefix:
p!

If you are using a different prefix, replace p! with the prefix you have set.

Change Prefix

Pancake uses the prefix p! for all of its commands by default. You can change this by using the prefix command.

In order to use the prefix command, enter the command:
p! prefix [new prefix]

For example:

p! prefix f

Sets Pancakes prefix to f.

Brackets

Brackets [ ] represent an argument that the bot is expecting within a command. When typing a command, you should substitute both the bracket and the text inside of the bracket with the parameter specified within the bracket.

For example:

p! play [song title]

means you should substitute “[song title]” with the song title of your choice.

p! play space oddity

is a valid command.

Invite Pancake to your Server

In order to invite Pancake to your server:

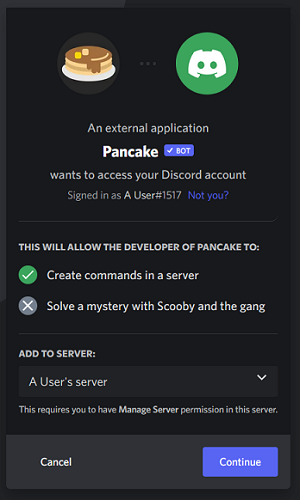
  1. Navigate to https://pancake.gg/invite.
  2. Select the server you would like invite the bot to under the Add To Server selection box.
  3. Select Continue to move onto the next screen.

    Warning: If your server does not appear on the list, it means you do not have permission to invite Pancake to that server. Make sure your account has a role with administrator or manage server permissions enabled within that server, and try again.

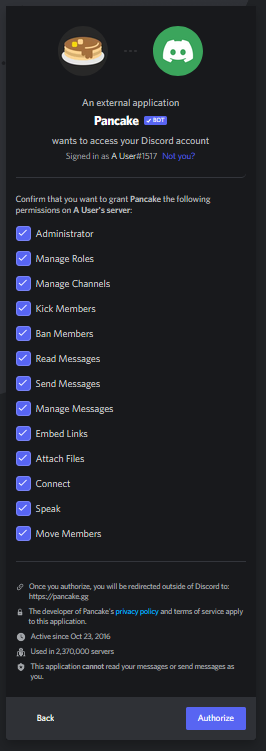
  1. Review which permissions you wish to grant Pancake. You can enable and disable permissions by clicking on the checkbox next to each permission.
  2. Click Authorize to finish setting up the invitation.

    Warning: In order for Pancake to play music, you must select the Connect, Speak, Send Messages, Read Messages, and Manage Messages permissions!

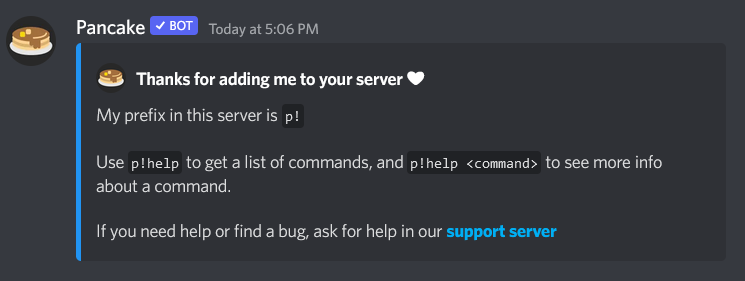
Once Discord has confirmed authorization, Pancake will join your server. You will be greeted with a welcome message.

Congratulations! Pancake is now successfully installed on your server.

Test Pancake using Ping

It is good practice to test any bots that you invite to your server. This is to ensure that the bot is working properly and can read and execute commands. You can test this by using the Ping command.

In order to use the ping command, enter the command:

p! ping

Pancake will respond with the message “Pong!”, followed by the amount of time (in milliseconds) it took for the command to process and reply back to the server.

This can be useful for debugging availability and latency issues caused by bot commands.

If you did not receive a response message, please check the FAQ section of this guide.

Get Started

Invite Pancake to your Voice Channel

Pancake must first join a voice channel in your server before it can start playing music. In order to invite Pancake into your music channel:

  1. Join a voice channel within your server that Pancake has access to.
  2. Enter the command:

p! join.

You will hear a ding, notifying you that Pancake has joined the voice chat.

Warning: You must be in a voice channel for this command to work. This command will only work if pancake is not already in another voice channel within this server.

Play Music

Pancake uses the YouTube API in order to play music through its audio. This means that you can use Pancake to play any song that you would be able to find on YouTube. You can use the play command in order to find and play music.

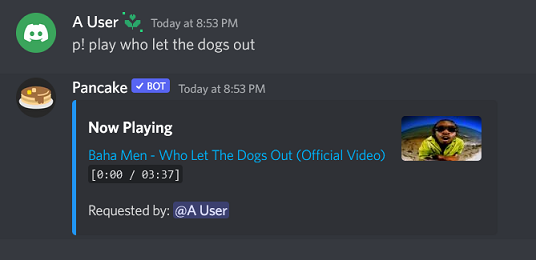
In order to start playing music in the voice channel, enter the command:
p! play [song title or YouTube link]

Check the Song Queue

Pancake uses a song queue in order to manage multiple song requests from multiple users. The queue has a “first come, first serve” priority. This means that the first song request gets played first, the second song request gets played second, etc. In order to check what songs are in the queue, you can use the queue command.

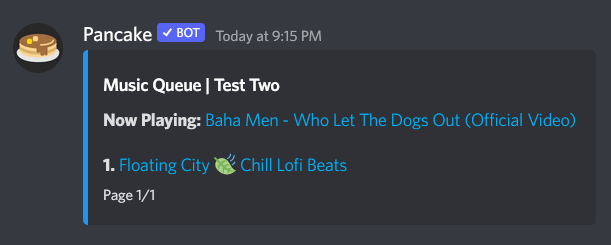
To check the queue, enter this command:
p! queue

Pancake will return a list of all the songs currently in queue, as well as the song that is currently playing.

Pause and Resume Music

You can pause the music at any time while its playing by using the pause command.

To pause the music, enter the command:
p! pause

This will pause the music stream

In order to resume, you can use the play command:
p! resume

Pancake will resume playing right where it left off.

Stop Music and Cleanup

Once you are done listening to music, you can stop the bot and have it leave the chat using the stop command.

To stop the music, enter the command:
p! stop

Pancake will perform the necessary steps to clean up and will clear its queue. Once its finished, Pancake will leave the voice channel.

Commands

This section is used to reference all the different music commands Pancake is able to perform. If a command has the premium perimeter set as true, this means that the command is only available to premium members who have purchased a pledge on Patreon.

autoplay

command:
p! autoplay [song title or youtube link]
example:
p! autoplay https://www.youtube.com/watch?v=dQw4w9WgXcQ
p! autoplay Never Gonna Give You Up
premium:
true

Autoplay is a premium feature that allows Pancake to automatically join your voice channel and play the song specified whenever a user enters the voice channel

bassboost

command:
p! bassboost [true or false]
example:
p! bassboost true
premium:
true

Bassboost is a premium feature that allows you to boost the bass of the song currently playing in the song queue.

join

command:
p! join
premium:
false

The join command allows Pancake to join the voice channel that the user is currently in.

lyrics

command:
p! lyrics [song title]
example:
p! lyrics Another Brick in the Wall
premium:
false

The lyrics command will output the lyrics of the song into the text channel specified within its arguments.  

move

command:
p! move [song in queue position] [position to move song to]
example:
p! move 1 2
premium:
false

The move command allows you to change the position of a song in the queue to another position. The first argument expects a number from the position the song is in the queue, and the second argument is where in the queue you want to move the song to.

nowplaying

command:
p! nowplaying
premium:
false

The now playing command will display the song currently playing in the song queue.

pause

command:
p! pause
premium:
false

The pause command will pause the current song that is playing in the queue list.

play

command:
p! play [song title or youtube link]
example:
p! play Africa Toto
premium:
false

The play command will add the song specified in the argument into the song queue. If there are no songs in the queue, it will automatically play the song. If the bot is not in a voice channel, it will automatically execute the join command and join the voice channel.

queue

command:
p! queue
premium:
false

The queue command displays the current song playing as well as the list of songs currently inside the queue.

remove

command:
p! remove [queue position to remove]
example:
p! remove 1
premium:
false

This command allows you to remove a song from the song queue.

repeat

command:
p! repeat [all or one or off]
example:
p! repeat one
premium:
false

The repeat command tells Pancake to repeat the current song once it ends. The all argument specifies that it will continuously keep looping the current song, one specifies that it will loop this song only once, and off will turn off looping.

resume

command:
p! pause
premium:
false

The resume command will resume playing the song at the top of the queue if it is currently paused.

command:
p! search [song title]
example:
p! search in the aeroplane over the sea
premium:
false

The search command will return the top 5 songs that pancake found on youtube matching the song title provided in the argument. You can click on any song link in order to add the song to the music queue.

seek

command:
p! seek [duration in seconds]
example:
p! seek 11
premium:
false

The seek command will fast forward or rewind the song to the seconds provided in the arguments.

shuffle

command:
p! shuffle
premium:
false

The shuffle command will randomize the positions of the songs in your queue list.

skip

command:
p! skip
premium:
false

The skip command will skip the current song playing and play the next song in the queue.

stop

command:
p! stop
premium:
false

The stop command will stop the bot from playing music, clear the queue, and exit the voice channel.

volume

command:
p! volume [percentage]
example:
p! volume 50
premium:
true

The volume command allows you turn the output volume of the music to the percentage specified in the arguments. An argument of 50 will turn the volume down by half, a volume of 0 will play no sounds, and a volume of 100 will play the volume at normal sound.

FAQ

My server doesnt appear in the Add to Server list when I try to invite Pancake.

This means that you do not have the proper role permissions on that server. Make sure your account has a role with administrator or manage server permissions enabled within that server and try again.

Pancake is not responding to any of my commands!

Use the p! ping command to confirm that Pancake is not responding to your commands.

  • If Pancake responds with the pong message, please make that you are typing the commands correctly without grammatical errors and try again.
  • If Pancake doesnt respond to your ping command, check to see that the bot isnt offline. If the bot is offline, then the bot is currently down for maintenance, and you will have to wait for the bot to come back online.
  • If the bot is online and still isnt responding, make sure that your prefix is set to the correct set of characters and try again.
  • You can set Pancake back to its default settings by kicking and reinviting Pancake back to your server. Try kicking and reinviting the bot and try again.

If you still arent receiving a reply, please open a ticket on Pancakes Github page.

I dont hear any music playing from the bot.

  • Make sure the volume is working on your end. You can test this by playing a video on Youtube and seeing if you can hear audio coming from your speaker.
  • If Pancake is the only source of audio that you cant hear from, make sure the bot isnt muted or turned down in your volume settings under Discord.
  • Make sure you arent deafened within the voice channel. If there is an icon of a headset with a cross over it next to your name in the voice channel, this mean you are deafened. Click on the headphones icon on the bottom left of the screen to undeafen yourself and try again.

If you still cant hear music coming from the bot, please open a ticket on Pancakes Github page.